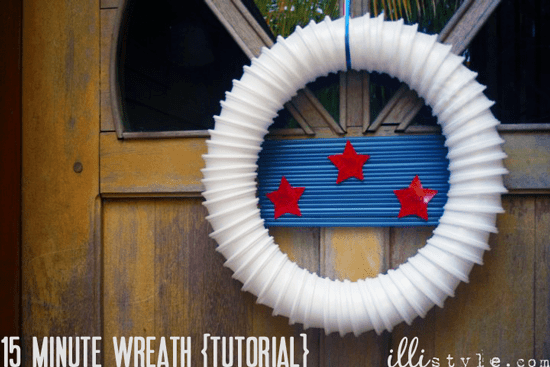
Today, the Summer Block party is back with a 4th of July wreath and you won't believe what it's made of. Take it away, April!
Hey loves! I am April and I blog over at illistyle.com all about my adventures as a wife, mother, artist, and missionary on the tiny island of Roatan, Honduras. I love to make things pretty and make occasions special, as well as showcase the amazing artistic talent of the beautiful people of Roatan. My motto is "I have limited time and limited resources... challenge accepted." Hop on over to illistyle.com and take a peek after you fall in love with me like you love Ann Marie.
Check out this super simple tute I made just for White House Black Shutters readers:
The 15 Minute Wreath {Tutorial}
So, check it out: this may be the easiest wreath you will ever make. Seriously. The first year I was married I wanted to make a Christmas wreath for our front door. So I did what any naive, newly married woman, making her first wreath would do: I went to Michael's and dropped a bunch of $$$ on a boat load of stuff: a grape wreath form, decorative picks, vines, floral wire, jewelry nippers (to cut the wire), and a lot more. I think I spent more on that wreath than on Christmas gifts that year. But do not tell my husband. It will be our little secret. Kay? Thanks. It's almost 10 years later (wow, that makes me feel old) and I have learned a thing or two. To make a great wreath you do not need a lot of money, or even a lot of time. If you want a quick and easy wreath to slap together for your next party (4th of July perhaps?) then look around your house, preferably in your pantry, and see what you've got - this should take a grand total of 5 minutes. I give you a full 5 because in my house the minute I go near the pantry I hear, "Mommy I want popcorn. Mommy I want raisins. Mommy I'm hunggggy." So grab your little one a snack and while you're there grab one for yourself. Also grab the following supplies:
If you are prepping for a party then you probably already have these little babies chillin' on your kitchen counter... and if you are like me then your glue gun is already there too.
So, now that you have all your supplies conveniently in front of you, here we go:
_______________________________________________________________________________
First we need to make the little flag in the center of the wreath - 5 minutes
Take your straws and two pieces of scrap cardboard. Line up your straws and cut cardboard to the right height. Place a line of glue on the cardboard and place over the end ¼" of your straws, repeat that process on the other side too. Let that dry another 2.5 Seconds and flip the whole thing over. (This way is easier than trying to get all 15 straws to stay in the right place in your hand as you put them on the cardboard.) This is the basis for your cute little "flag" background inside the wreath. The cardboard will attach to the cup wreath and give it stability. Take it from me: don't try to attach the straw directly to the wreath. The uneven cup rims will make your straws all jacked-up. Stick with the cardboard trick and your straws will lie flat, pretty pretty.
_______________________________________________________________________________
Using a marker, draw a start on the back of a plate. Paper or plastic? Remember when they used to ask that at the store? In this case: who cares, they both work. Woohoo! If you are anal and want perfect stars then you might want to print one out on your computer and then trace it. But that seems like a lot of work and defeats the purpose of this being a project you can do in 15 minutes. Taking an extra minute at your computer seems like a lot of work... 16 minutes is too long for me, obviously.
_______________________________________________________________________________
Put a dab of hot glue on the back of each star and place on the straws. Isn't that just so cute. And quick. Ok, set your flag aside for a minute.
_______________________________________________________________________________
Next we need to make the cup wreath - 5 minutes
For our cup wreath, take your tower of cups and lay them down on your work surface.
_______________________________________________________________________________
Start gluing cups together by placing a dab of glue on the outside of cup B and sliding it back (most of the way) into cup A - leaving the top of the cup partially exposed. You do not want to stack them closed. You want to tilt your cup slightly to the right, and let glue dry like 2.5 sec. Then place a dab of glue onto cup C and slide it into cup B, tilting slightly again and letting dry. This will make your cup tower naturally curve to the right (if you are a lefty you can put the glue on the left to make it easier for yourself) because you are gluing on the same side (which is the inside of the wreath).
_______________________________________________________________________________
As your cups curve to the right, continue to add more cups and glue together. Soon, you will see a half circle, then a ¾ circle, and then a full circle. To close the circle, simply glue to last cup to the first cup. Easy Peasy. Set that aside for a minute.
Friendly tips: as you work, move the completed part of the form counter-clockwise (so your work area stays at the same place and you're not breaking your wrist just to glue some cups together). *Important: use the little straw flag you just made as a size guide, you want your cup wreath to be just a hair larger than your flag. The flag sits right inside the inner circle. It's that cool, it's in the "inner circle." Get it? (Yes, I am THIS funny, all the time.)
_______________________________________________________________________________
Alright, grab your flag again and slap some more glue on that cardboard. Put a nice thick line down each side.
_______________________________________________________________________________
Grab that beautiful cup wreath you made and stick it right on top of your hot glue lines. Let sit for 5-10 seconds. Done!
Now admire your beautiful creation. Ohhh...ahhhh. Now go hang that bad boy on your door, your party guests could be here any minute! Enjoy your party!
Other great things from illistyle:
Hahaha, don’t you love her?! I was totally that wife. And I still have store bought St. Patrick’s day garland that I never used up in my garage sale pile. I hate going to the store sometimes, and I love using what you have to create. PERFECT PROJECT! April gets an A+ 🙂
I also thought I should mention that April told me that her wreath was actually inspired by a project I did here (the Fiesta Party Wreath) and that she wasn’t sure if she should tell you guys. SO COOL!!! I think that is awesome, but I do like hers better because it has the repurposing element to it.
Thanks for taking over for a day, April!
edited to add: Thank you for the talk yesterday. I think we needed that. 🙂


Used Cars in Tampa FL
Neat blog! Is your theme custom made or did you
download it from somewhere? A theme like yours with a
feew simple tweeks would really make mmy blog stand out.
Please let me know where you got your design. Appreciate
it
Karen
Love it! A great way to use stuff you already have. I'm doing this today (since we can't go outside in the 106 degree heat anyway!)!!
Ann Marie
yeah, going to the craft store is NOT fun when you're headed there in this crazy heat. It'll be 103 today. Shaking my head over here... stay cool, Karen!
Jill Wilhelm
I love your wreath! I love the idea of repurposing 🙂 and doing it in style! Found you through the follow me link party! Love your name too!!
Ann Marie
thanks, Jill! I need to go back and follow you (and everyone else). Thanks for reminding me and stopping by 🙂
Janette
See, now that is something I could do! I just wish I could visually see things like that in my head! Great idea!! Glad to meet you & April!
Ann Marie
RIGHT!?! I love projects like that. Thank you (and I'm speaking on behalf of April, too), so nice to meet you, Janette!
Erin @ DIY On the Cheap
Love this! Very clever.
Ann Marie
ditto to what you said! I love the creativity behind April's wreath. Thanks for commenting 😉
Erin
Very cute! You have to love using the things you already have! 🙂
Ann Marie
Isn't it so cute? It's like April read my mind and knew I like to use that kind of stuff... 🙂