• Skip to primary navigation
  • Skip to main content
  • Skip to primary sidebar
white house black shutters
  • About This Site
  • Project Gallery
  • Decluttering Guides
  • About 40 BAGS IN 40 DAYS™
  • House Tour
  • Most Recent Projects & Posts
menu icon
go to homepage
search icon
Homepage link
  • About This Site
  • Project Gallery
  • Decluttering Guides
  • About 40 BAGS IN 40 DAYS™
  • House Tour
  • Most Recent Projects & Posts
    • Email
    • Facebook
    • Instagram
    • Pinterest
  • ×

    Hanging Votive Planter

    July 12, 2012 |

    I love buying stuff on sale or second hand. There is nothing like finding something that you know is one of a kind (or if on sale, limited), it’s almost like a treasure hunt. Sometimes you have a million places where you can put something, but sometimes you have to rack your brain to make it work for you. You can also learn a lot about a person and I’m intrigued by how different each person can see a piece!
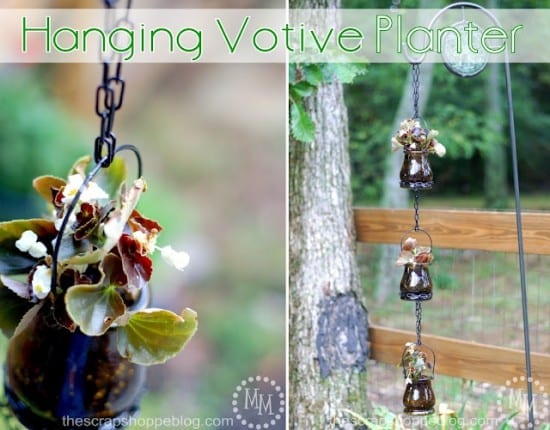
     

    Today’s guest poster for the Summer Block Party, Michele of The Scrap Shoppe, took a find and made it do what she needed it to. These vases are beautiful, but I would have thought “flower” and not “planter” when seeing them.  Michelle put a design element to work, and DIY’ed her way into a beautiful piece.

     Hello, friends!
    I'm Michele, and I create at The Scrap Shoppe.
    On top of being a scrapbook paper hoarder and remnant fabric collector, I'm a huge garden lover.
    And the best part of gardening?
    Its all outside so the hubs can't complain about my "collection" of flowers taking over the house!
    Not that he would ever do that...
    I found these fun green glass votives at Old Time Pottery a couple of months back for $1.49 each.
    I thought they would look fun with some flowers in them!
    I love planters where I can see what the roots of the plants are doing.
    Unfortunately when I went to hang them in my garden they looked like one hot mess.
    This clump just isn't doing it for me!
    I decided the votives needed to spread out by hanging one on top of the other.
    I scoured Lowe's for chain and came up with this thin black chain that matched the handles on my votives.
    (Alternatively you could use wire instead of chain.)
    You will also need a couple of pairs of pliers.
    My votives have this handy indention near the bottom of the glass (see the arrow).
    Its the perfect place to add the chain!
    Wrap the chain around the vase so you know where you will need to put the links together.
    Use your pliers to open the link in the chain.
    You want to be sure to open the link side-to-side.
    Link the chain together then close the open link with your pliers.
    Keep the extra chain attached to the original link (right photo above).
    Measure how much distance you want between the top and bottom votives then trim the chain by opening another link then attach the open link to the opposite side of the chain wrapped around the bottom of the above votive.
    Close the open link then repeat the entire process with the third votive.
    I added a loop of chain around the handle of my top votive so I could hang it in my garden.
    I'm loving how my hanging votive planter turned out!
    No more hot mess, and it really adds some great height to my garden.
    Thanks for having me over, Ann Marie!
    I would love for you all to visit me sometime at The Scrap Shoppe!

    More guest posts

    • Recycled T-Shirt Mini Wreath
    • Create a Meaningful Home
    • Backyard Olympics with Kristen Duke
    • Clipboard Chore Charts

    Subscribe

    for updates, tips, and free decluttering guides

    Reader Interactions

    Comments

    1. Elmo

      September 05, 2014 at 9:35 pm

      Howdy just wanted to give you a quick heads up and let you
      know a few of the pictures aren't loading correctly.

      I'm not sure why but I think its a linking issue. I've tried it in two different browsers
      and both show the same results.

    2. bissell cleanview vacuum amazon

      May 08, 2014 at 12:53 am

      It was working well, but in a two story townhouse, carrying it up
      and down the stairs was proving to be challenging. That kind of sucks
      since it can cost you $60 to get a replacement.

      The Bissell 82H1 Cleanview Helix Bagless Upright can
      also be about 20 pounds that's not fat or too light.

    3. qr.net

      August 01, 2013 at 2:19 am

      Hi everyone, it's my first go to see at this site, and paragraph is in fact fruitful in favor of me, keep up posting these types of articles.

    4. Ashley T

      July 18, 2012 at 2:11 pm

      I love those! I think I need to get out and get some of these 🙂

    5. Beverly {Flamingo Toes}

      July 12, 2012 at 6:57 pm

      LOVE!!! That is so creative of you Michele - I never would have thought of using the votives like that but they look so great!! I am going to be hunting up hanging votives now! 🙂

    6. Megan

      July 12, 2012 at 2:31 pm

      That is just beautiful. I love it!

    Primary Sidebar

    Hi, I'm Ann Marie. I want to help you find peace in your home through simplifying your life, taking on small projects, and learning to find your style. Learn more about this site and why I started it...

    • Email
    • Facebook
    • Instagram
    • Pinterest

    CATEGORIES:

    Hi, I'm Ann Marie. I want to help you find peace in your home through simplifying your life, taking on small projects, and learning to find your style. Learn more about this site and why I started it...

    Footer

    return to the top

    About

    • About
    • House Tours
    • Projects
    • About 40 Bags in 40 Days

    Newsletter

    • Sign Up! for emails and updates

    Social

    • Instagram
    • Pinterest
    • 40 Bags in 40 Days
      Facebook Group
    • WHBS Facebook Page

    Copyright © 2023 White House Black Shutters