
There's something that drives me nuts about first time home buyer shows. Many times they look at a room and say "this needs to be gutted", to which someone replies "oh yes, a kitchen remodel will cost about 15 to 30 thousand" and they get all scared because they can barely afford the closing.
They've got it all wrong. You can gut and pour money into a room all at once, but you do not NEED to. Here's how to afford a kitchen remodel when you can't afford a new kitchen.
For most people or rooms, it's just not possible right off the bat. You might have to do-it-yourself, learn how, and/or ask family members for help. Your remodel might take longer, you chip away at the parts you don't like bit by bit, invest money into projects when you have it, and maybe wait a few years to have a finished (or semi-finished) space.
If you're attempting a bit-by-bit renovation on a budget, here are some tips:
- make a list of the things you want to change (all of them)
- re-write the list so that it is written in the order that you can finish
- visit stores often, look for deals, specials, closeout sales
- scour your local Habitat for Humanity Restore for paint and fixtures, as well as garage sales
- have an open discussion about finances and make a plan
- turn off the TV at night in favor of painting or working on stuff
- help family members out with their projects and exchange services
- same goes for babysitting (see this post on tips for working on a project with kids)
When you have your plan, get to work!
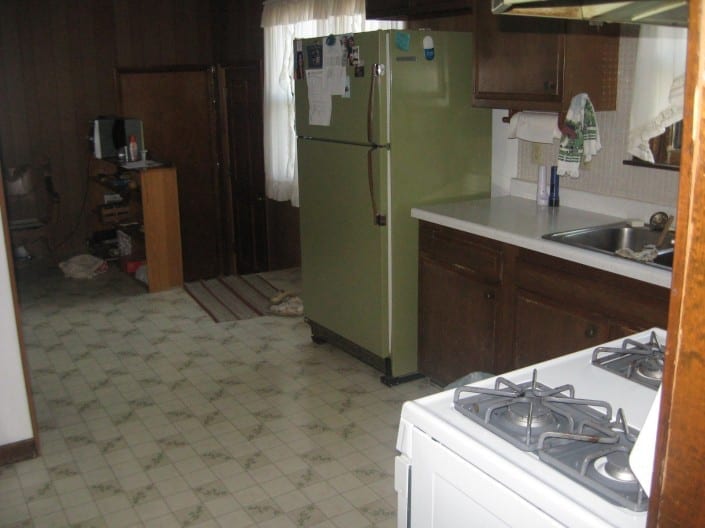
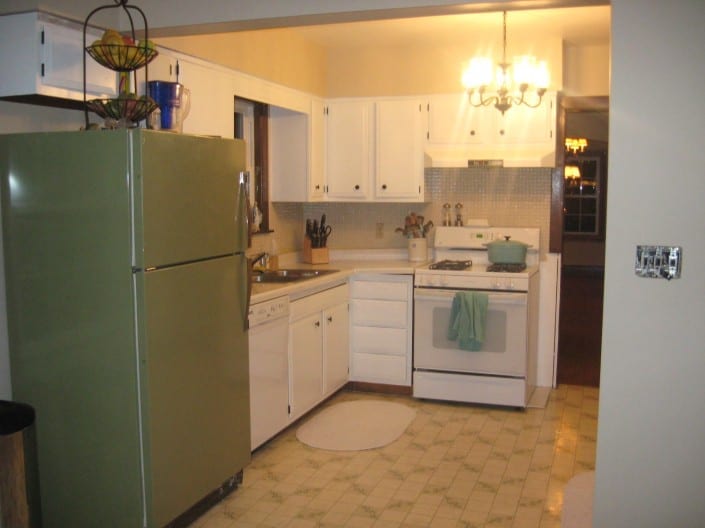
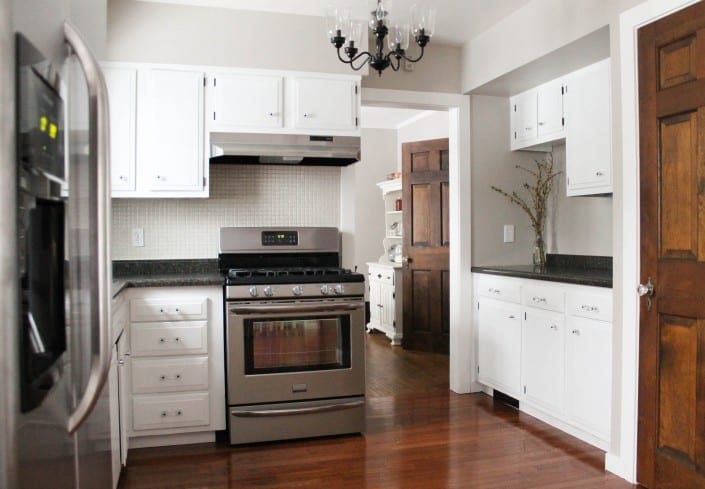
Here is our kitchen in September 2009:
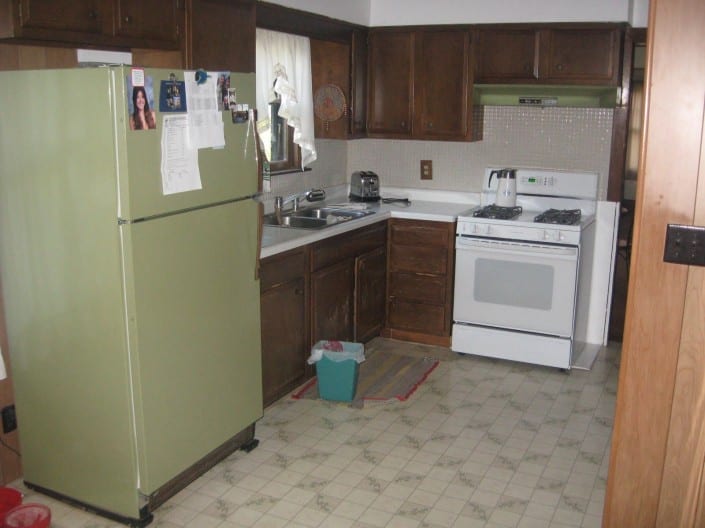
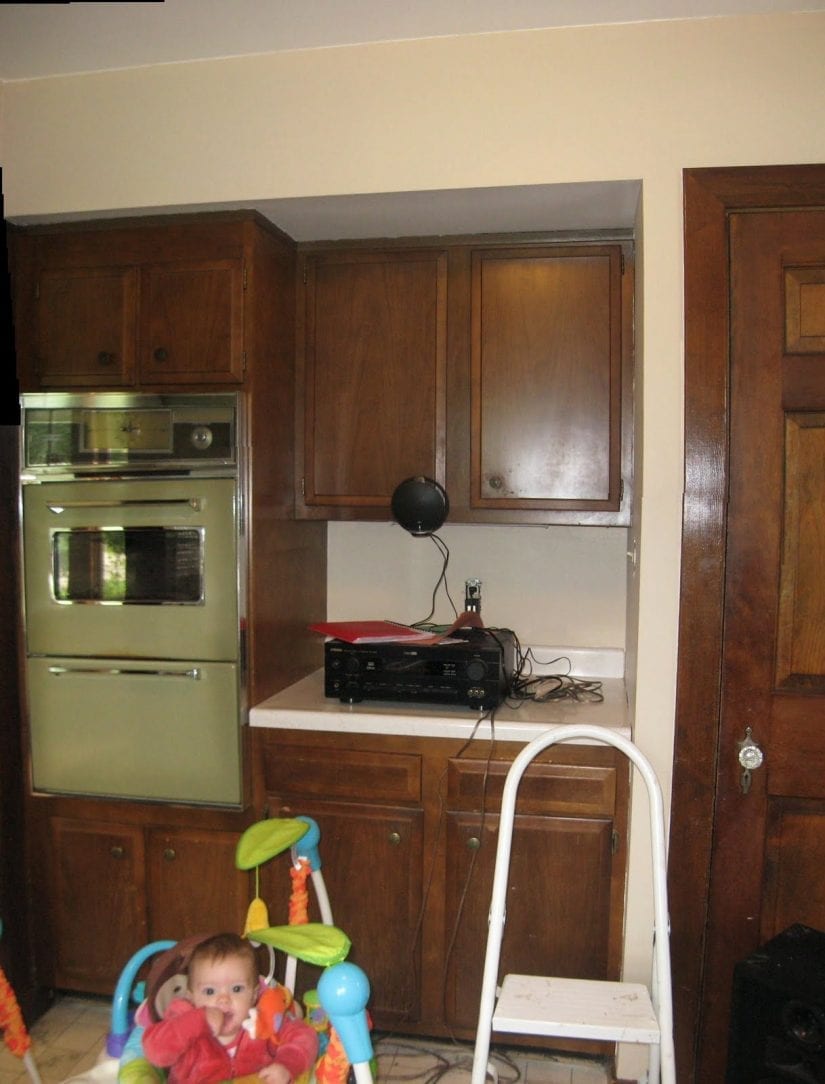
Beautiful, isn't it! 😉 Right off the bat we moved some cabinets around. We had a non-working "avocado" double oven, a working range/oven, and no dishwasher. The double oven was taken out, a cabinet next to the sink was taken out and put in place of the double oven, and a dishwasher was added next to the sink.
We painted the cabinets and walls, and spray painted the existing knobs and hinges. Moving the cabinets made the gold flecked countertops wonky, but okay to live with. The fridge and oven came with the house and worked great, so they stayed too.
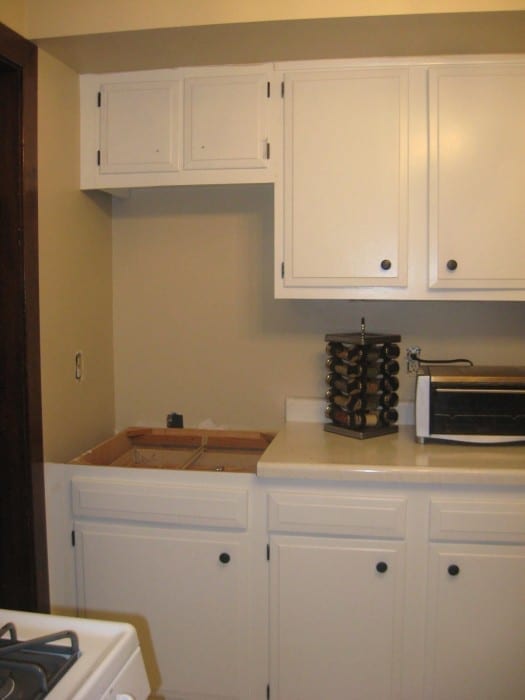
Our in-laws were replacing a fridge and gave us their white one (bye, green fridge!).
We found granite-look laminate countertops at a Black Friday sale for around $100, and installed them. Wow, what a difference! This is what our kitchen looked like for a while. Didn't love the tile, but it worked!
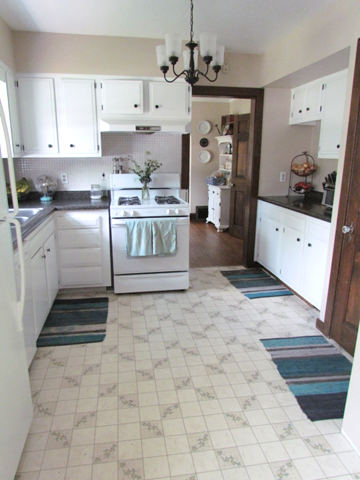
In April 2012, we were able to install hardwood floors in place of our 30-40 year old laminate tile. We were able to find a sale, signed up for emails for 10% off, and signed up for their card to get even more off. The total price per square foot was around $2.20, making the approximate cost around $300 for the kitchen (including supplies).
While you don't see it, we also fixed squeaky floors. And I blurred out the mess in the dining room. Oops.

While we were in project mode, the kitchen was painted a grey-beige (Martha Stewart "Sharkey Gray"), and the rest of the trim was painted white.
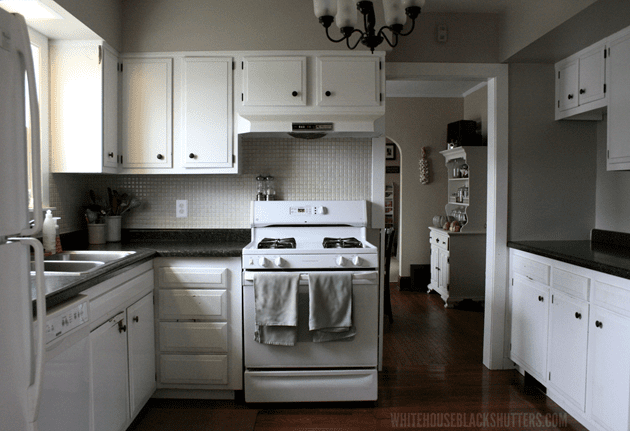
In February 2014, we replaced our white appliances with stainless steel. We found a really great sale at a local store. We got a multi-appliance rebate by buying all Frigidare appliances. The store also had a friends and family promotion and offered free delivery. Our total cost for the refrigerator, dishwasher, oven, and range hood was around $2,200.
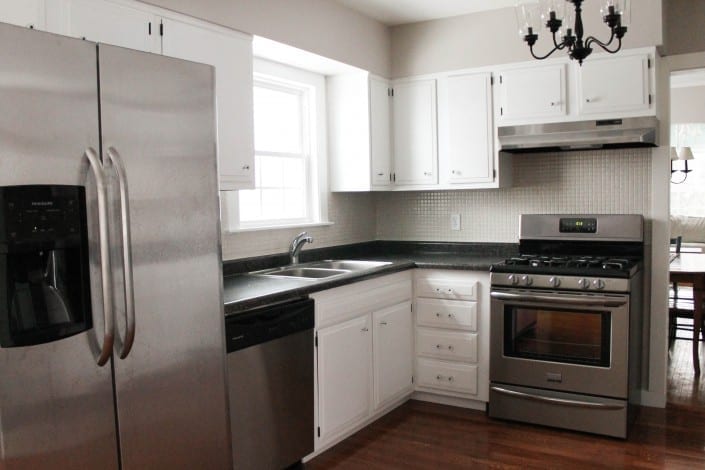
We touched up cabinets and Doug rebuilt the trim near the doorway to the dining room. We also installed glass knobs and pulls (found online at D. Lawless Hardware for half the price of other stores!). Here's our kitchen now:
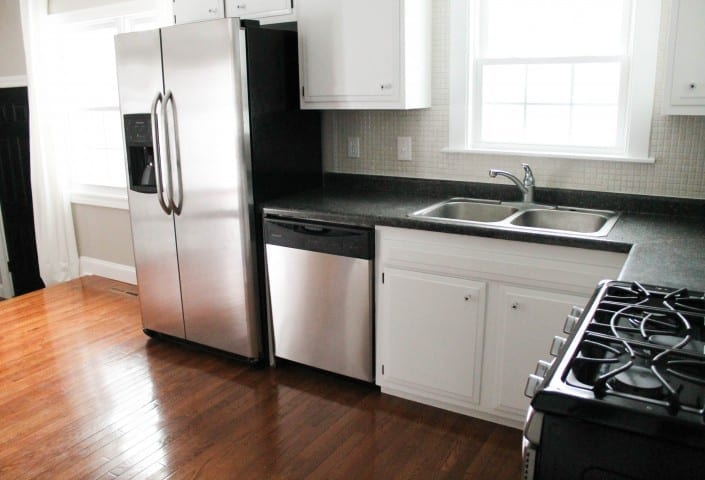
Four and a half years total, money spent bit by bit. We didn't gut or replace everything, we used what we had and improved it. And the biggest change was the one that cost the least - painting the cabinets!

If you're interested, you can see more updated house pictures and before pictures in our house tour.
So what do you think?
Do you have a room (or whole house) being remodeled over time?
Note: I've gotten emails asking if anyone really lives in this space. (HA! Yes.) I do like our kitchen counters clean, however, we took these photos to sell our home and removed everything from the counters.
Andy Shepard
I have been thinking about painting my cabinets too, but I definitely don’t want to end up with the issue you had with it ending up chalky. Could you please tell me what brand that was so that I can avoid it? I’m very sensitive to texture and chalkiness will most likely not work for me.
Ann Marie Heasley
Hi Andy, I think you may be thinking about another post. Our cabinets were not chalky and had a normal texture. I was very happy with the results.
Christine
Came in via Pinterest. 🙂
I think people are intimidated and just afraid of doing it wrong.
I'm rebuilding after a fire, and had no choice but to DIY. ex-jerk-DH bailed on me, but left behind 3 generations' worth of tools. Yeah me! Get more use out of them than I ever did him! LOL!
If it includes the word "just" it's never that easy. However, "just" taking down or hanging kitchen cabinets is. If this 5'2" chick can stand on a counter, press her head against the ceiling and screw/unscrew cabinets to change them or replace them with something I built? Anyone can do this. Hanging them, they're balanced on drywall buckets on the counter. Done. (Just don't straddle the stove while cooking chicken soup at the same time. Don't ask me how I know.)
I, too, really dislike the House Hunters or the 1st time buyer shows. Such senses of entitlement. They whine about granite or color of floors/tile/paint/fixtures/EVERYTHING that's such a non-issue in the scope of everything. Even those buy a piece of crap and fix it up shows have too much of that. They've SEEN the shows, for God's sake. Then, "exceeds expectations?" You had a PIECE OF CRAP so what did you expect? Again, entitlement. How 'bout, "Oh, it's beautiful."
Anyway, I, too, am fixing up in the method you're talking about. I truly have the house that CL, H4H, reuse centers, and junk on the side of the road has built. I figured out that my not-finished but furnished living room has a total of $400s' worth of stuff I've purchased, and much of that is paint. (No trim yet...)
As a dear friend put it when I was overwhelmed, "Baby steps. Just take baby steps."
Thanks for letting me get that off MY chest!
connie dandurand
Loved the part about turning off the TV. BEAUTIFUL TRANSFORMATION.
Deb
After the remodel, those old brown wooden doors looked pretty.
Cindy
I love this post! We're about to buy an old house and the kitchen looks similar to your 'before' picture. We have been going back and forth being getting it all redone before we move or wait. Budget-wise we would really prefer to wait.
My main concern is how it work regarding floor. Can you replace the floor around the cabinet? Did you please your under the cabinets at all?
Would love any tips on this!
Ann Marie Heasley
Hi Cindy, how exciting! We did the wood floors under the fridge, stove, but replaced them right up to the cabinets. I believe the laminate floor did not go under them either. We didn't do the wood flooring underneath the dishwasher, it wouldn't fit if we did, but I think some people do put it under the dishwasher. I am really glad we painted the cabinets before we moved in and wish we had the time to do so before we moved into our current house (we sold the one in this post last October).
Looking back on this post and our old kitchen, sure it would have been nice to do it all right away, but it wasn't possible for us budget wise! It was also nice to live with the space and know exactly what we wanted to change. I would do it over again exactly as we had. 🙂
Keep me posted on how it goes!! You'll be in my thoughts and prayers as you navigate through the home buying process.
Katie - creativeblinds.com
What a great effort! Nearly 5 years, eventually your kitchen has remodeled. I can't as patient as what you have done. Perhaps, I can spend a few thousand dollars at once because honestly I'm a bit extravagant.
Kathy
Thanks for this great story, which has given me much hope for renovating my first house. I am still a bit confused about what to do with my kitchen. I need new cabinetry. There is water damage and I also want to/need to reconfigure the layout. However, I also need new floor tiles as the existing ones are cracked in many places and are just awful. Which do I tackle first? In most renovations the usual advice is to do flooring first and cabinets second. But if I want to do this in stages, I would need to rip out the cabinets, put down new flooring and put the old cabinets back, at least temporarily. Do you think this is the best way to tackle it? Advice appreciated, thanks!
Danielle
I think painting the cabinets is an amazing and cheap change, if the cabinets are in good condition. I've debated painting the cabinets at our house so much but they are so cheap that I fear taking the doors off to paint would mean never getting them back on. Just have to save up for the big full make over I suppose.
Jo
Which is all well and good if all you need is a *cosmetic* remodel. I rehabbed an old Victorian. Great bones, lovely custom built cabinets. I did similarly, did most of the work myself. Piecemeal until it was done. That worked *only* because the cabinets were solid and usable and the layout of the kitchen did not need to be changed.
Our current house? This approach will not work. The problem isn't cosmetic (the kitchen *looks* lovely thanks to the moronic flippers) but the layout is unusable. You can't open the fridge doors while standing in front of it (not kidding). More than two people can't be int eh kitchen at one time and even those two have to navigate carefully. The dishwasher door when open blocks *all* of the cabinets (seriously). Not to mention the cabinets they used aren't kitchen cabinets, they're technically meant for a laundry room so they aren't deep enough for many kitchen items.
The whole thing must be gutted or we'd have to live with a pretty but nonfunctional kitchen. That's just the long and short of it. If you need to replace cabinets, or move fixtures (plumbing) you are going to have to gut your kitchen, trying to do it piecemeal in those instances might actually cost *more.* We can still save money by doing the demolition ourselves, by doing the painting, etc the stuff we can do. But there's no way around an improperly designed kitchen. There just isn't. (Well you could do what the flippers did which is slap pretty lip stick on it, but hten you still have a rotten kitchen that's good for nothing but looking at.)
Lisa
Did you install the wood floors under the cabinets or around and if so, was this an issue with blocking appliances/dishwasher in case you needed to replace/ pull out at some point?
Thk u
Ann Marie Heasley
Hi Lisa! We did install around the cabinets. However, we installed the wood floors under the dishwasher, fridge, and oven for that reason. And I'm glad we did, we had to pull the fridge and oven out a few times to clean back there. Hope this helps!
Melissa Slaton
Ann Marie,
Such an amazing kitchen! Even when you took it one step at a time it still looked good at each step (not mismatched at all). This was probably a lot less stressful than fronting all the money and having it take extra time all at once! The white makes everything look so much brighter and the counter tops really look great!
Jennifer Cooper
We are in the process of buying our first house... ( we are in our late 30's so this is a big deal for us) this house is small and in need of updoing here and there... thank you for the reminder that we are investing 15-30 years into this house, major renovation can wait its turn.
Jennifer
Do you have an idea of what the total cost of the remodel was over the 5 years? The kitchen looks beautiful!
Sarah may
Thank you for the easy breathing I am now experiencing. While I "knew" this in my head before I read it, seeing someone else and the real life patience and living is just a great encouragement. My husband and I just made an offer on a house built in the 50s that's not terrible but definitely needs some TLC. My desire is to take my time and do things slowly to both save money and get it the way I really want without feeling pressured to have an immediate showroom. I just really appreciate your real life view!
Sandy H.
YES! We do have a project that we've been working on over time- TEN YEARS! We purchased our "Love Shack" 10 years ago (with cash) and did an addition- then we moved into the addition, tore down the old part, and rebuilt on top of the old foundation! It's still not done, but we're doing it like you, bit by bit! It will be SO worth it in the end. Love your reno!
Ann Marie Heasley
Love shack, haha! Now you have me singing. 🙂 It's so nice to see and appreciate little bits of progress. And the fact that you paid cash makes it even more exciting! Thanks for the sweet words, Sandy! Best of luck on your project. 🙂
Barbara Fox
Question on painting the cabinets: did you take doors off and drawers out ? Did you spray paint them or brush paint on by hand? And maybe you have already posted on this subject. I would love to know.
Cathy
What did you do to insure the cabinets looked good long term? My husband is afraid the white willjust scratch off and look bad : (
Julie
Cathy I have a friend who recently did her cabinets too. She used a kit bought at lowes for around $65 and it covered quite a bit of cabinets. I will be doing it as well some day. It comes with a deglosser (which is supposed to eliminate the sanding step) but she recommended sanding it a bit too. Not make-your-arm-fall-off sanding but just that little extra will help the paint adhere. She has young kids and so far so good it's holding up. That was my biggest fear too. I don't want to be touching up scratches. She also said waiting between coats of every step is vital!!! And wait extra time too!! Don't rush it. She also used a stain/gloss type stuff on the insets edges to give it some character and by God it turned out beautiful!! Good luck!! And she said it wasn't nearly as difficult as she thought it would be and was kicking herself for not doing it sooner!
Cathy
Thanks so much for responding- give me hope we can do it!!!
MJ
This is a great project. Most H.O. don't wait and tackle a project over time like you. I think it's a marvelous idea. I'm coming towards the end of my kitchen project. And now will be working on my bathroom project. I hope I can save money like you. Thanks for the wisdom and the inspiration!
Robin Anders
We have been in our house for 7 years and I so want to do something so similar to this to my kitchen. I can't even stand to be in there. Thanks for the advice. Wish I knew how to send you a picture.
Amanda
We bought out house in 2012 and are doing the same plan as you did! We immediately got rid of our '90s wall-paper and curtains, painted our kitchen peach, painted the cabinets antique white and bought butcher block counter-tops from Ikea. We still have flooring, window treatments, and appliances to upgrade, but it looks SOOOO much better than when we bought the place 🙂 Painting the cabinets were quite the project (cleaning, sanding, priming, painting) but well worth it!
Lisa
My husband and I just saw this and we are inspired! We're your cabinets wood or laminate? What kind of paint did you use?
Jessica Marquez
I have to ask about that beautiful wood door I see in the kitchen (pantry door?) and that matching one beyond in the dining room--were the salvaged? DIY project?? I'd love to hear about those! They make SUCH a difference in the look of a room (I hate builder grade oak).
diane @smartmoneysimplelife
Wow. Your kitchen looks amazing. I imagine you enjoy it even more knowing not only that you did it yourself but also that there's no debt hanging over you.
Well done!
Note to self: see... patience *is* a virtue! 🙂
Lauren
This is awesome! We're going to be buying our first house in a few years (if all goes well), and remodeling is something I was worried about. Every place we've rented I've had dreams of refinishing, I'm imagining I might go a bit nuts when I can actually do it. Will have to keep this in mind.
That said, I totally would have kept the double oven and green fridge as long as they worked well and tried to find a stove that matched. I'd prefer yellow, but no one seems to make colored appliances anymore!
Shelby
Looks awesome! I'm wondering if you painted or did anything with the tile walls? We have tile on our walls, but it is not as sparkly. 🙂
Susan Johnson
awesome! We bought our house in the country 3 years ago. It was a repo and the previous owners trashed it and removed anything and everything possible--light fixtures, towel bars, and toilet paper holder included! We got the cheapest, most plain things we could find, knowing we would replace it all eventually. Our main focus was the office since we work from home. We did all our own work including installing laminate flooring. Now we're ready for a partial kitchen remodel! It will be exactly what we want....someday!
Lisa
I love your blog. I just bought a house and I am thinking about being a copy cat and doing this with my kitchen. Right now I have yellow countertops. Yuck! 🙂
Love what you are doing with your new house as well!
Christine
Hi there! Got here indirectly from Pinterest via Kitchn.com.
Love your work!
I'm on a 10 year (next December) kitchen (and whole house) remodel. Mine's a bit different, in that we had a fire and took the opportunity to remodel. Why not? Much of the hard work was done!
Sadly, DH bailed on me leaving me with a horrendous mess. No electricity, no plumbing, no HVAC, 7 cats & 3 dogs. OMG. However, he left behind his tools, far more valuable than he was, which I've taught myself to use. Sorry. Inner Voice got away from me there.
What I've learned, and I think was somewhat unsaid in your post, is that time also gives you the luxury of changing your mind. New products come out, your tastes develop or take a different twist. If you're smart and reading, you learn more about efficiency, how you work in your own kitchen, and what you'd really love -- to keep and/or get rid of! And bonus: you can get EXACTLY what you want without having to compromise if you're taking the time to save.
Your kitchen is lovely. It's layout looks like one of the Levitt homes in Bowie, MD. Practical, but did need today's upgrades! 🙂
Thanks for sharing your lovely kitchen. Dining room and all.
Danielle S.
This is absolutely a great read! We're getting into buying our first home and of course you see so many projects you'd like to do and simply can't afford all at once. I love how you took this step by step, and the finished product is very tasteful and elegant!! There are a lot of unrealistic DIY and remodeling posts out there, AKA first homes that are Mansions...haha, but I love this! Thanks for writing the post and providing inspiration.
Tina Matteson
Your kitchen is beautiful. Thanks for all the great tips.
Britanie
Oh thank you for posting this! We bought our first house a year ago and there are SO many things I want to change but we are having to improve things just like this. Slowly and bit by bit. Sometimes I get discouraged because I feel like I will never get the house the way I want it. So it is really nice to see that eventually my little efforts here and there will pay off. 🙂
laura
Good for you! It does bug me when the home improvement shows say "we'll have to gut it"....WHAT? I just remodeled my kitchen with $60 cupboards from a 50's house (real wood and solid) formica $2 sq. ft vs. granite.....and hardware from amazon $2 each vs. $6-10 elsewhere. Remodeling doesn't have to be expensive. I found an awesome nearly new stainless sink with a drainboard on craigslist that originally was $1100 and I got it for $50 thanks to a rich lady wanting a new one 🙂 Also found enough Ann Sacks tile to do my back splash (for $50) from a contractor who had left overs. Got to mention ReStore. Thmm1/2 used gallon of laminant adhesive, bags of grout and tile (100 for $3). And just because you are doing the change on the cheap doesn't mean you cant have what you want.
Wendy
Awesome site!! I plan on buying my first home and it needs major TLC. I look forward to trying it. Beautiful job!!
Betsy
I love what you did with your kitchen! We have an older kitchen that is in need to new cabinets and countertops. Painting is a breeze for me but I have never replaced countertops or added/moved cabinets before. Any suggestions for where to start? It seems that people (who are not professionals) do this all the time but it seems a bit daunting. Thanks!
Anne Marie
You kitchen project is an inspiration to me and my hubby! Thanks for sharing your story. I have two questions (I hope they weren't already asked/answered):
1. what did you smuse for knobs and what was the process?
2. Did you paint or do anything with the insides of your cabinets?
Thank you!!
Ann Marie Heasley
I don't know if your questions were answered already, but I'll answer them any way. 🙂
1.) At first (see the old pictures), we sprayed the hardware and hinges with Rustoleum Oil Rubbed Bronze spray paint. We had those in for 4? years and they wore fine, but the more used cabinets showed signs of wear. I unscrewed and re-sprayed as needed. The best way to spray was to poke the knobs through a piece of cardboard! The hinges still look/work great. We later replaced them with glass knobs and pulls we bought from D. Lawless Hardware and I looove them. Their price, selection, and customer service was outstanding.
2.) I didn't do anything with the insides! I painted hutches a year after the cabinets and even though we aren't going in and out of them as much as the cabinets, they are all scuffed up. I wouldn't recommend painting the inside unless you have glass fronts. If you can see in them, I would recommend some kind of heavy duty sealant (no brand recommendations as I haven't done it).
3.) If you happened to see this post on The Kitchn, I will add in that we didn't spray paint our cabinets (they made a misprint). Here's the process: http://www.whitehouseblackshutters.com/how-to-paint-kitchen-cabinets/
Hope that helps, best of luck to you! 🙂
Madge
Beautiful remodel, we have done the same thing with 2 houses, bit by bit completely remodeled and saved a lot of money doing it ourselves, we both have all the expertise, from drywall, painting , plumbing and electrical. It's also very pleasing to say "we did it ourselves"
April
We are trying to decide if we want to save and get all our flooring at once or do one room at a time. It's the biggest decision in money allotment right now. 🙂 The two rooms that get wood do not touch each other so I think they can be separate, but there will be a big run of tile floors. I dread doing it all at once but it makes sense.
Julie
Depending on the wood you're going to put down---- for instance cherry. It will get darker the longer it is exposed. So if you were thinking you could match them up later- it would never happen. Research the flooring before doing it in cycles. (I'm not super smart--I just have neighbors that did exactly what I just described lol) I too would love wood floors but I don't do it because they're just going to get a big rug thrown on top of it lol. My other neighbors just did new wood floors too and they got them for a bargain on a close out deal at a wood liquidator Just be sure to buy MORE than what you'll need in case of acciDENTS or incorrect measuring Good luck!!!
Ann Marie Heasley
Yes, I'll second the buying more part. We had a whole box full of bent, not usable wood. We bought ours from Lowes and were able to take them back, thank goodness.
To April, if you don't mind if they match and the rooms don't touch, I would definitely go room by room! If you do want them to match, I would wait and do it all at once. My inlaws did the hallway of their home, then waited to do their bedroom and the two don't match! Even with the same company/finish/store they bought it from. It isn't a big difference, but there was a difference. Best of luck!!
Kim Roman
Wow! This is a beautiful inspiration.
A friend posted your 40 Bags in 40 Days challenge on Facebook - today is Day 2. I'm SO glad I decided to "click further" 🙂
Last night hubby and I were doing some preliminary planning for the upcoming kitchen remodel. Thankfully the cabinets are in GREAT shape. He'll upgrade the drawer boxes and shelves - customizing the cabinet INTERIORS for better organization. It should be a snap once I complete the 40 Day challenge.
Thank you SO much and . . . keep up the outstanding work!
Stacy
Thank you for this. We are first time homebuyers. The kitchen is in good shape except for the tile backsplash and blue countertops. This gives me motivation to do things little by little as we can afford it. There are other upgrades in the house we want to make as well, without blowing our budget or going into massive debt. Your kitchen is beautiful!!
Jessica
I'm in the process of deciding how to best deal with our standard oak cabinets and am wondering how your paint job on the cabinets has held up over 4+ years? That's the longest span I've heard so I am abundantly curious if they are sticking, chipping, peeling, etc? and if not, what was your method? I don't like the oak but I don't want to make the situation worse :^\ Thanks!
Julie
Just curious what her answer is too-as to how well it's held up......??
Kellie
This is really inspiring! My husband and I just bought our second home and I'm dying to dive into the kitchen, but the funds just aren't there at the moment. This just shows you can make it livable and still draw it out over a few years span of time. Love it!
Ann Marie Heasley
Congratulations on your new home, Kellie! It's so tough to restrain yourself mentally (but I guess easier in real life if you don't have the funds, haha!). You guys can do it! Keep me posted on how it goes. 🙂
Mavis
Great job. This is like my kitchen transformation, bit by bit and when I have the funds. Like you, the best improvement was painting the cabinets.
Susan
NICE JOB! You did it perfectly! In older homes cabinets are solid wood--even replacements only have solid wood doors. It would be crazy to replace when you can just paint!
Lisa
Thanks for sharing this. We just bought our house in November and, being on a fixed income, we know changes will have to come over time. Right now, paint is our friend. I'm almost finished with our cabinets and totally loving the new look. We're using a gel stain over paint on the lower cabinets. It actually makes our kitchen look bigger! Who would have thought!
Julie Carrigan
Lisa I'd love to see a before and after pic of your cabinets!!! I am going to tackle mine when I figure out how to do it the easiest/cheapest/ and most durable way. Please please please post a pic!!!??
Julie
CandiL
I am wanting to put wood flooring in my kitchen/dining/living room area it's an open floor plan...Just wondering if you put the flooring under the cabinets or just up to the kick boards.
Ann Marie Heasley
Just up to the kickboards! Good luck on your project, you'll love the wood. 🙂
Dawn
WOW you did great. I myself don't have that much patients. But it was worth the wait
Carla
Beautiful job! I love the white and always enjoy seeing what can be done on a budget. Smart!
Clairlyn
I saw that you said you spray painted the knobs and hinges on your cabinets. How have they been holding up? Also, can you give any tips on refinishing the cabinets? Mine are stained wood and I want them white as well.
Ann Marie Heasley
They have held up great! The knobs definitely had wear like I expected, but the hinges are great. So much so that we kept them and I've never touched them up. Rustoleum now has the Oil Rubbed Bronze in a paint form and before we replaced the knobs, I touched them up twice with that. Could I have touched them up more often? Maybe. But it didn't bug me.
I will add that we knew we wanted to replace the knobs eventually, so dealing with some chips and wear wasn't a big deal to me. 🙂 We had them up for 4 years so it was definitely worth the cost if you'd like to some day replace them! Or if you don't mind touching them up, haha.
As far as the cabinets, this comment would be WAY too long to describe that. 🙂 I'm working on a post with that process as well as how we painted the trim. I'll try to remember to reply to this comment when it is up!
Hope that helps!!
Ann Marie Heasley
I finally finished my post on painting the cabinets, here's the process we used: http://www.whitehouseblackshutters.com/how-to-paint-kitchen-cabinets/
Rebecca
WHERE oh WHERE did you get those counters for $100?
I can wait until Black Friday. Please share your secrets!! 🙂
Ann Marie Heasley
Menards! The Black Friday sale was about $5 per linear foot, I think the regular price is more like $14-15. But that was 4 years ago so things might have changed. 🙂
Best of luck! They have held up really well.
katie
WOW what an amazing transformation! Great tips, friend!
WeShipFloors
Doing this our self, and going on a three-year bit by bit remodel. Actually just bought the hardware and probably should have bought it first because just those little things have made a huge difference.... Almost as much as the new paint. Great post BTW.
Marianne Downing
Found your pix on a FB feed. I live 1000 miles away but I have your before kitchen - I swear! Great inspiration to me that something is possible here. My home was built in 1982 but the builder apparently was enamored of the 1970's colonial dark knotty pine look - it is on all cabinets and all woodwork. Alas, it is not the "chic" dark woodwork of pottery barn, nor is it the classic 1930's kind like you have. It seems like you have a mix of the original stain and painted? Does that work well for you? Or are you planning on painting all woodwork?
Lisa
What a wonderful result! Your kitchen is fabulous!
I also yo with painting my cabinets and stress over what product to use, and if the entire inside should be done.
Cabinet Painting 101 please!
Ann Marie Heasley
Cabinet Painting 101: A simple process even non-DIYers can handle. Here you go! 🙂 http://www.whitehouseblackshutters.com/how-to-paint-kitchen-cabinets/
Julie Carrigan
I love your new look!! Your kitchen was/is so similar to mine!! I want to paint my cabinets too but am terrified of using the wrong paint. I've seen disasters where the paints gets scratched easily. Could you tell me exactly how you did your cabinets please?? Prep (sanding) or did you use the new paint on product that eliminates that step? And what paint did you use? And any coating or finish after painting? Did you spray any cabinets or just use paint brush and or roller? I currently have mismatched pickled and stock wood look cabinets. I want uniform and white or off white. Please advize me your thoughts!! Thank you sooooo much!!!!
Misty
My husband and I moved into our house a year an a half ago. We live in an area that is growing very quickly due to the economy so we couldn't be picky with our price range. I refinished our cabinets with Rustoleum Cabinet Transformations and went from builder oak to an antique cream finish. My husband replaced out our lights with more modern fixtures and we bought our stainless steel appliances in stages so we didn't have to drop a lot of cash at once on them. I'm in the process of painting all our ugly builder oak trim white and replacing all the brass doorknobs in our house. Our intent is to sell in 4 years so my "to-do" list is based on the biggest bang for our buck when it comes to resale at that time.
Jenn @ My Fabuless Life
AMEN! I seriously SCREAM at the TV when I watch House Hunters and the home reno shows. "We can't afford to give you another bedroom because we had to replace wiring, but that light fixture we put in was $3,000, oh, and the lamp was $1200." Thanks for letting me get that one off my chest 😉 Your kitchen looks amazing!!
anita
What do the cabinets looklike inside? Did you paint them white too?
Emily
It looks beautiful!
Soooo, how did you paint the cabinets? How long did it take? Would you do it that way again or choose a different method of painting? I'm in the "researching" phase for our kitchen.
Thanks!
LINDSAY
I was going to ask the same question! We have lovely cabinets but I want white instead of wood. I need some convincing that painting is the right way to go!
Ann Marie Heasley
I wish I knew the answer! We have the same beautiful ivory color in our bathrooms. :-/
Denise
What a beautiful home! I especially love your mom cave. Several years ago, we turned our traditional, unused living room into the room now affectionately know as Starbucks. We have four, big comfy microfiber chairs around a large, round antique coffee table. I worried that people would think it was strange. Everyone loves it! And more importantly, it gets used -- everyday! I love your blog. Thanks!
Jane Collier
Beautiful kitchen!
Ellie
Your kitchen is amazing! I love it! Does it kinda bum you out that your house is listed now that it's feeling done? Or are you excited for the possibilities? Do you have a place you want to buy yet? Best wishes!
Ann Marie Heasley
Thank you, Ellie!! At first I was a little bummed, but I'm ready for the next chapter to start. We don't have a place in mind, I've actually been trying not to look. Every time I find one I love, it sells, haha! Just have to trust that the right one will come along... eventually. 🙂
Margo
Love it!!
Did you install the floors yourself and do you have any other lighting besides the central chandelier?
Doug
We did install the floor ourselves. There are many online tutorials and you can rent the nail gun from a home improvement store for a reasonable price. For lighting, we have the chandelier, a light over the sink, and a light on the range hood. Thanks Margo!
Sheena
Your kitchen looks beautiful! We plugged away at our kitchen slowly too, painted cabinets and hunted down deals and it made it so worth it in the end!
Jeanne Takenaka
Your kitchen looks beautiful! And your plan makes a lot of sense. Thanks for sharing how you renovated your kitchen!
Kari Collins
What great changes you made. Beautiful kitchen!
Ann Marie Heasley
Thank you, Kari! Hope all is well up there. 🙂