
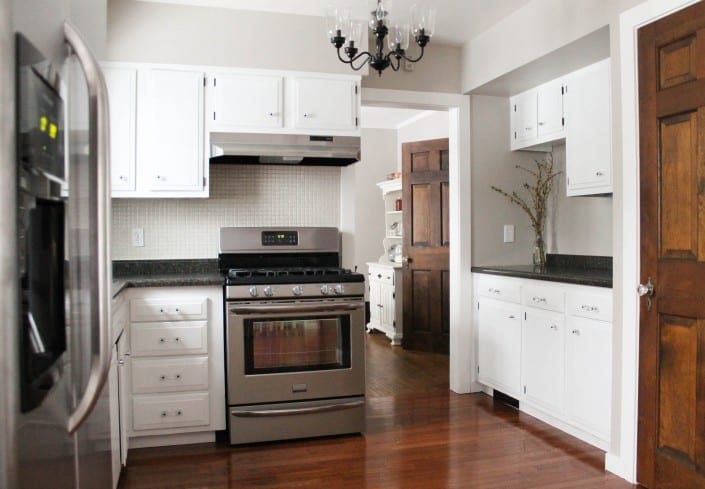
One of the first things we did upon moving into our home 4.5 years ago was paint our kitchen cabinets. It was one of my first big DIY projects, and wasn't too tricky!
I could write out a complicated tutorial with lots of pictures, but I'm not going to do that. Here is a simple, straightforward guide on how to paint kitchen cabinets. Keep in mind that I am not an expert, but this method has held up for us for 4.5 years!
If you'd like to see full before, in-progress, and after pictures on our kitchen that took 4.5 years to renovate, here is a post on how to afford a kitchen remodel.
1. Wash Everything
No explanation needed here. Your paint won't stick if the cabinets are gross. Clean it all up!
2. Lightly Sand Everything
A coarse grit sandpaper is fine, just grab a block or sheet and lightly go over the doors, cabinets, and drawer fronts.
3. Remove Doors and Drawers
Lay them out in a pattern that resembles your kitchen, maybe even make a map to show you where everything goes back. I drew our kitchen and placed big numbers on each door on the picture. I then laid everything out starting at 1 and up so it was in order.
Once your doors and drawers are removed, remove all of the hardware. If you are using old hinges and plan to reuse them, label them according to the cabinet. I taped the hinge with painters' tape and write a big number onto it with permanent marker.
4. Make a plan.
Section this project into pieces for the following steps. For example, first do all of your upper cabinets, then the lowers. Once those are finished being primed and painted, then move to the drawers and doors. Sure this is tedious, but you want to do it the right way to ensure it is finished.
Have kids? Here's our guide to tackling projects with kids around.
5. Coat with one coat of Zinsser Cover Stain primer
We used the Zinsser Cover Stain on our trim and it is a wonderful primer for going over existing stain. You won't have much bleeding. The only con is that it stinks due to being oil-based.
To be honest, we used regular Kilz primer on our cabinets and looking back, I don't recommend it for this project. The stain bled through the first coat of primer, the coverage wasn't as good, and we used more coats. Save yourself the trouble and use Zinsser Cover Stain. (They aren't paying me to say that.)
6. Paint Your Cabinets
Once your primer has dried, start painting. Follow your plan above and work in sections. Start with your doors, set them on something like cans from your pantry so that they aren't leaning or on the ground. Then work your way to the drawers, then to the bases.
I do not have a specific paint brand recommendation, but recommend using a semi-gloss or gloss paint since they are easier to clean. We used a paint + primer with two coats, but most sources recommend using thinner coats and more coats.
We used Behr "Ultra White" which was a good match for our white appliances. I normally like brushing things on, but for this project, use a small roller since it won't leave brush marks.
Apply a coat, give it plenty of time to dry (at LEAST 24 hours. More time if you can.), then get ready for a second coat. Before you apply the second coat, lightly sand any drips. Repeat as you add more coats of paint.
Also, I did not remove everything from inside the cabinets and I did not paint the insides. I was unsure of how the paint would do with dishes and other items being dragged in and out. Looking back, I'm happy we made this call. We have a hutch in our dining room we painted 3 years ago; even though we don't take stuff out of it too often, the paint hasn't held up well in there.
7.Give it Some Space
Even if your paint is dry to touch, it can take much longer for it to fully dry. If you are able to, I recommend giving your kitchen at least a week, if not longer, to dry before putting everything back together.
8. Put it Back Together
I realize this does not need explanation, but if I ended the tutorial at 7, your kitchen would look crazy. Put hardware and hinges back in place, put doors and drawers back on. Sit back and enjoy your newly painted kitchen!
9. Prepare for Touch-ups and Cleaning
Congrats, you now have a white kitchen! But you know what else you gained? A dirt magnet.
I'm joking, it isn't that bad.
But you might find that you clean your white cabinets more often. This is fine by me because if I had wood cabinets, I probably wouldn't wash them. I need that glaring, dirty reminder in my face to remind me to wipe them down. 🙂 And I would much rather have bright, white cabinets to give me that illusion of clean.
For easy touch ups, grab a small mason jar or baby food container, fill it with paint,and label it with the color and room of the cabinets. Keep it in the kitchen so you can dab paint on easily.
Would you paint your kitchen? Have you?
Have any tips you'd like to add?
I'd love to hear more about your projects in the comments!


U.Jerry
I moved in a new apartment with very ugly kitchen cabinets. I don't like the color at all. I just can't believe that someone can paint their kitchen cabinets in dark green color! I want to repaint them with something lighter. I will clean the whole kitchen and then start with the project! Thank you for describing the process so detailed!
Ruth
I just finished mine after MUCH research. I have 1980's not-so-well built cabinets. I washed (scrubbed) with TSP and steel wool, and I did not sand. I also made sure I rinsed them down well (using a damp cloth- not running water). I used an alkyd paint (2 coats)
The paint says it reaches maximum hardness at 2 weeks and I'd say it's pretty tough. I didn't use primer or a clear coat because we don't plan on the cabinets being in place for more than about 5 years (they are falling apart, but this buys us some time).
While I didn't necessarily do it in the best manner, it should buy us some time. What I loved about the alkyd paint is that it is soap and water washable- so clean up was a breeze.
I like that you've done your kitchen much the way we've tackled ours- a little at a time.
And I've learned it never hurts to ask when making big purchases. I got a new spiffy range hood for $250 (half off) which is pretty reasonable considering I needed a 36" one. I also got a cast iron sink for about 1/3 of the price because it was discontinued.
It's slow going, but there is nothing quite like having the satisfaction of creating your own space and watching the progress (and knowing it was done right).
visit website
Very nice tips here! It is always a good idea to renovate the cabinets in the kitchen because it starts look fresh and clean. Keep going with the nice ideas!
Emma
Thank you so much for writing this post! I just followed the link fromApartment Therapy and thought, "Ok, I feel stuck again, having no idea how to *actually* do this project [on our old '70's dark wood cabinets]." But you wrote a post for a normal person! And the how-to with kids is also brilliant. From one mom/non-pro to another, than you so very much. I ig hit get a kitchen that I love after all!
Ann Marie Heasley
It was SO easy, Emma! This was one of my first big DIYs. If we did it (and it held up like it did), you can DEFINITELY do it! You can get that kitchen. 🙂
April
So in April I promised a post about my cabinets (someone linked over to my blog from this page, probably disappointed...)- still haven't gotten around to it! But I will, I launched a Before and After series that I'll put it in.
I am also looking for guest post for the before and after, if you want to check out the first one and see if you'd be interested in a post for the series.
Thanks for your awesome inspiration!
Lynda M O
We repainted our kitchen including the cabinet insides because I took the doors off first thing when we bought in 2002. I have a small kitchen and minuscule cabinetry so it shows itself off best with the look wide open. I used Exterior Latex Semi-Gloss-two coats and it looks Superb six years later. Cleans up like a charm, looks like the gorgeous Sky has come indoors and just pleases me every time I walk in there day after day. (color name: Crystal Waters either OSH or Home Depot-don't recall now. It was Behr's Paint)
April
I have the doors and drawers removed from my daughter's bathroom cabinets. I decided to start small before moving to the kitchen. I also found this fabulous wrapping paper that I am going to decoupage the drawers and the inside of the cabinet. (No I don't have too much time on my hands, quite the opposite lol) I am sooooo ready for fresh and pretty and organized. Hopefully there will be a post with pictures in the next week at http://www.notquitewonderwoman.com. Until then I'm gonna stalk around your blog a little and get even more inspired.
Sharon @ Parents of a Dozen
You did an awesome job! The whole kitchen looks so nice, clean, and fresh!
Cassie
I love your kitchen! I think white kitchens are so beautiful, but I have gone back and forth about painting our cabinets. I know it would make our whole house seem brighter and bigger, I'm just not ready to make the jump!
DontBlameTheKids
Perfect timing! I am planning a complete DIY kitchen overhaul. I am painting the walls, painting the cabinets, and installing backsplash. I have absolutely no skills and have never done anything like it before. Am I insane? Please talk me out of it.
SheMadeMeDoIt
You can do it, doesn't take any skill (I know, I've done almost everything) it does take a lot of thought, and patience though. Don't give up, you'll be fine!
Rose
Your kitchen looks amazing. I went back and looked at your before and after pictures. It is an amazing difference! I would not have thought it would make such a difference!!!
I wish that I was brave enough to do such a project!!
Ann Marie Heasley
Thank you so much, Rose. 🙂 Picture me singing "I want to see you be brave!"
Julie Carrigan
I am curious what brand and other info you would suggest for the clear coat? Also how to apply etc. thank you for allllllll of your advice!! You make it sound so easy lol.
FYI I painted a sideboard/buffet and put a clear coat on it and it's getting scratched up. I used primer and paint that were VERY VERY expensive in order to prevent such things and they didn't work like they should have. I'm very disappointed! I'm a sucker for lowes salespeople I guess. So I don't want a repeat of that on my kitchen cabinets (obviously) The only thing I did wrong was maybe not giving enough time between coats of primer, paint and clear coat. But I did as the directions suggested on each product. Any thoughts? Thx again! Oh and th doors and drawers stick now (from the paint and stuff) so it's hard to open them. Would running a bar of soap on the edges help with that you think? ????
Julie C
Ann Marie Heasley
I wish I had a suggestion but don't, I haven't used a clear coat over white paint. At the time I was worried it would yellow so I didn't even look or try. :-/ That being said, ours have held up okay with regular touch-ups and cleaning! I just wouldn't recommend painting the inside.
That is awful that it scratched like that!! I'm sad for you. 🙁 I would DEFINITELY allow for more time for the cabinets. I didn't on some kitchen stools (primer to paint to 2nd coat in a few hours) and they have held up horribly. I learned my lesson!
I'm not sure if the soap would help or not, but I will remember that idea and try it out if I have that happen in the future! Good luck and let me know how it all goes. 🙂
Julie Carrigan
I have to say my kitchen cabinet are
Already white inside. YAHOOOO The outsides are the pickeled (which just isn't cute anymore) I used to LOVE pickeled but it out of date now and I love the French country look. My fav!!!!