
At the end of January, we started renovation on our laundry room. It was an okay space, but with a family of 6 it was feeling a bit cramped. We've been making great progress on the room and instead of doing one big reveal, here's an update on where we're at now.
The main goals of the project were/are to:
- make it less cramped
- utilize smarter storage options
- expand the tiny closet into a family friendly mudroom
- make it pretty (hey, while we're at it...)
Here are some before pictures alongside how it's looking now, and a little bit on what we've done to work on those goals.
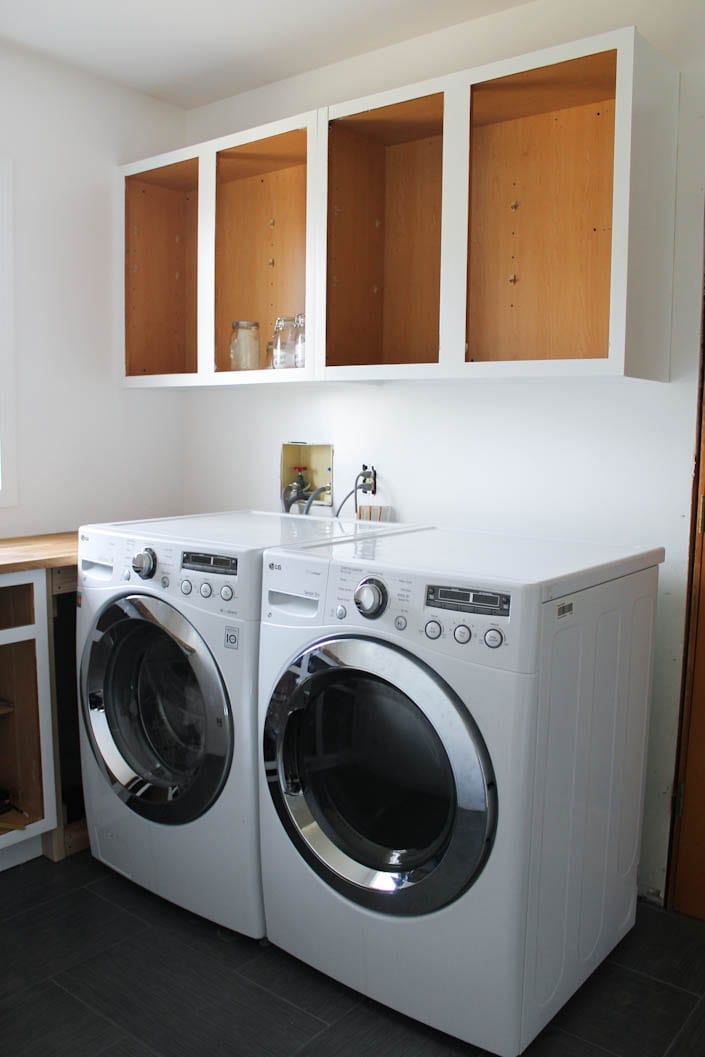
The Cabinets:
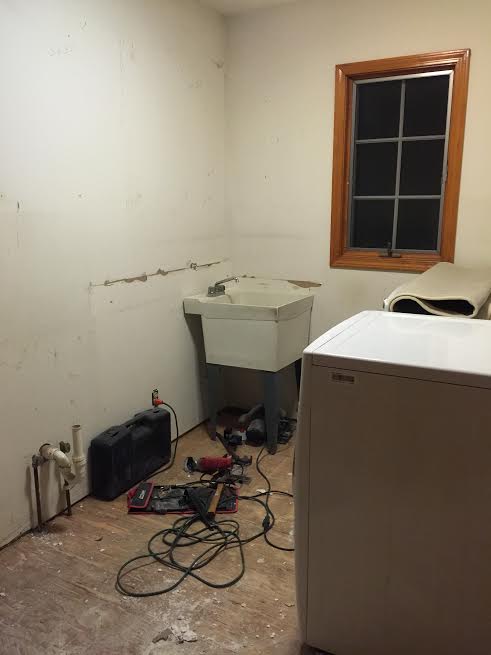
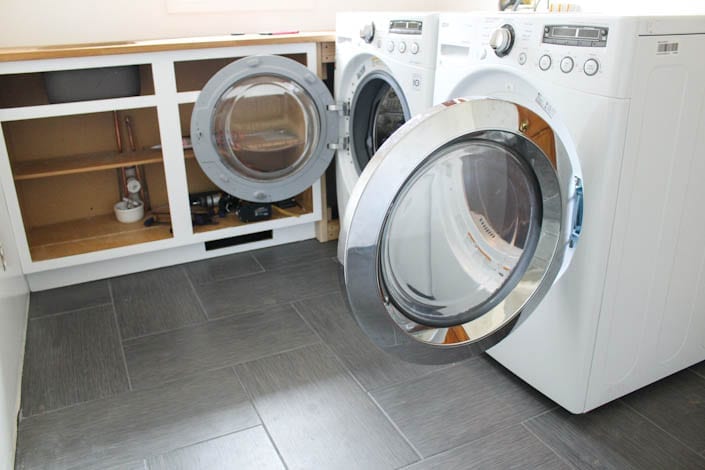
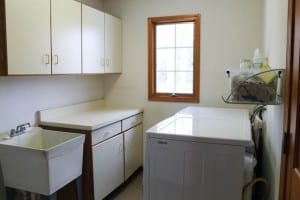
To start the project, we took out those cabinets you see on the left of the picture, as well as the utility sink (loved its size, but needed space). Took off the cabinet fronts, cut the bottom cabinet and pieced it back together, painted both uppers and lowers, slid the washer and dryer close to the door, and put them into their new spots.
Oh and moved plumbing all around and added a counter and sink. I add that in as if it was an easy task, it was probably one of the hardest parts.
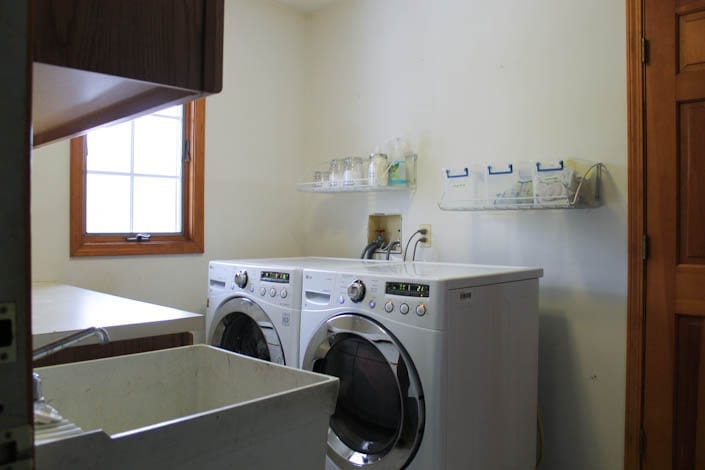
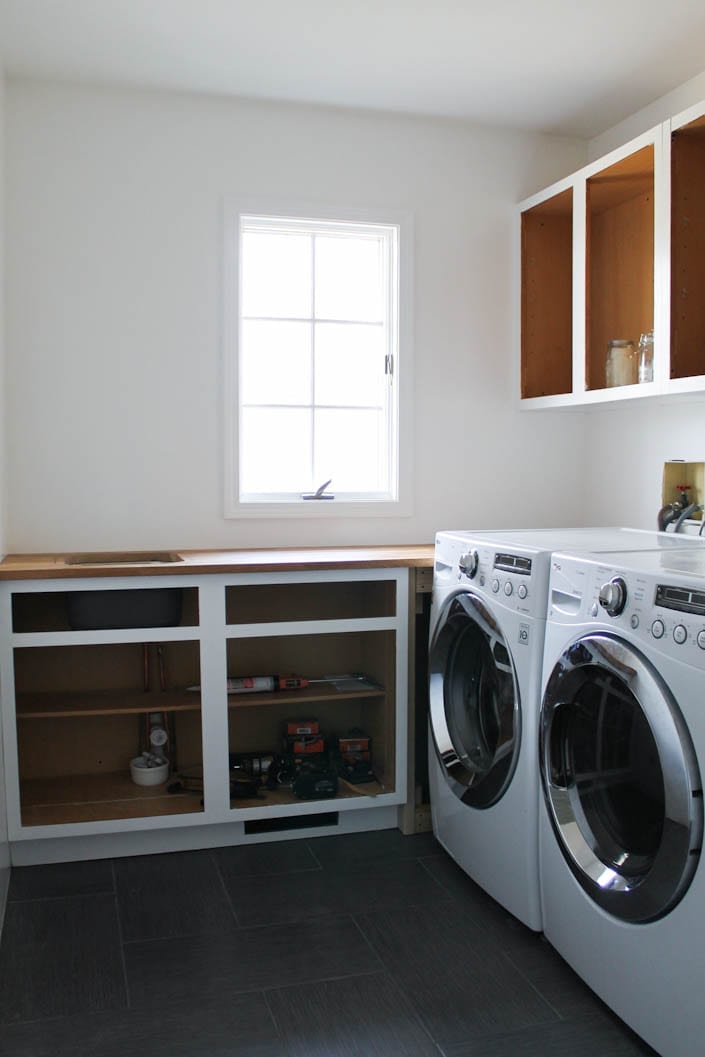
One of our biggest gripes was that there wasn't much room in our laundry room to, you know, do laundry. Now, there's room for all six of us to pitch in at the same time. And with the new L-shaped placement of the cabinets, we'll be able to store stuff and actually get it out! 😉

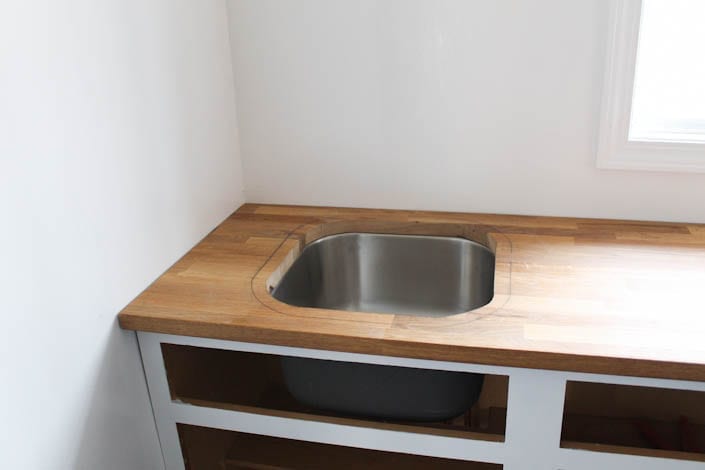
Here's a peek at the new countertop. We bought oak butcher block from IKEA, cut it down to fit the space, and also have another piece to build up on top of the washer and dryer. Still need to seal it, still need to figure out what to do to hide those washer hookups. But don't look at those, look at the gorgeous wood grain.
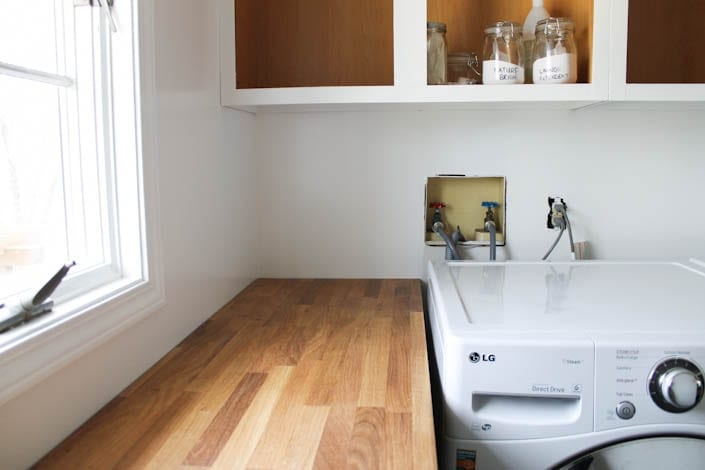
Finding a sink to fit this narrow countertop was a challenge. We cut the cabinet down and pieced it back together to fit in the 18" gap between the washer and the wall. Hard to find small sinks that are also deep! If you need one too, look for a bar sink or a prep sink. We ordered this sink on Amazon and it ended up being 16" square and 8" deep, deep enough to soak dirty laundry which equals perfect in my book.
We just installed the counter and sink, and by just installed, I mean last night. So please excuse the pencil marks. 🙂
We ordered this faucet from Amazon for in here, but liked it so much that we installed it in the kitchen and ordered a duplicate for in here!
The cabinet bases are wood, but the cabinet doors are laminate. At this point, we're not sure if we should attempt to build our own doors and drawer front pieces, or try to find a paint product that would stick and hold up.
Do you have any experience with painting laminate/formica? Or building your own cabinet doors? If so, I'd love to hear more details on what worked for you.

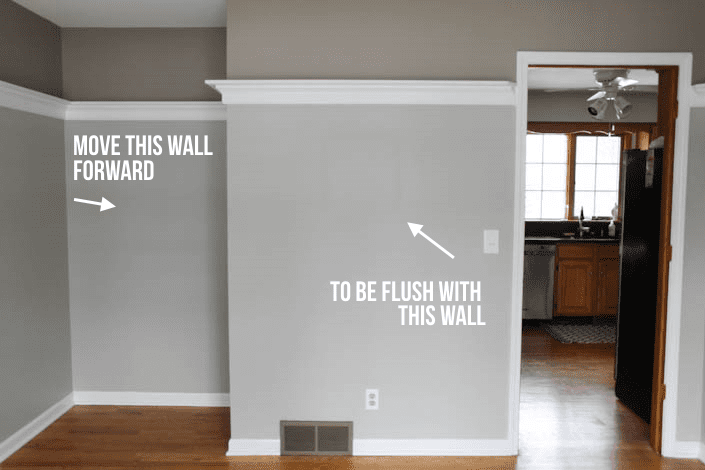
The Walls (and Future Mudroom Area):
This is one area we were really excited about (see messy closet pictures/why here). We had a nook in the room behind this wall that we didn't need and this room needed more room. The pictures explain what we did better than my words can.
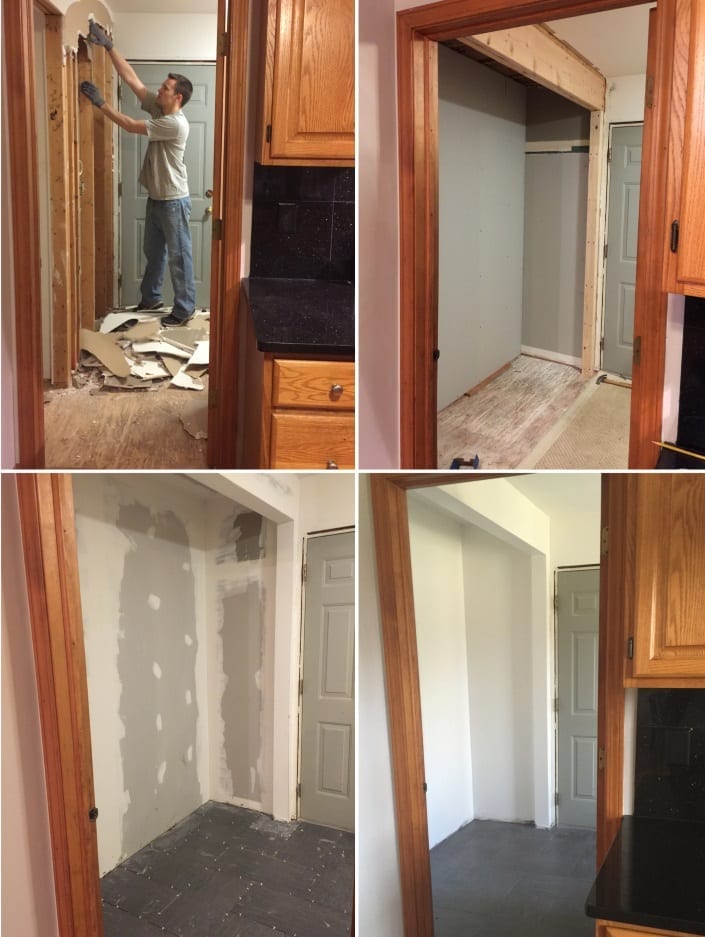
My dad is a carpenter and Doug is pretty handy which is what you need if you want to do something similar. Doug started by taking out the trim and ripping out drywall. I'm going to spare you my amateur version of the specifics, but basically they cut things, jacked the ceiling up with temporary supports, and moved a wall into a new spot.
Only attempt this if you are also working with someone who knows what they're doing.
We weren't too sure if any of these walls were load bearing or not, it turns out half of the wall was? Or so I'm told? So we ended up having to add a beam which was no big deal to us. Here's the before and how it looks now.


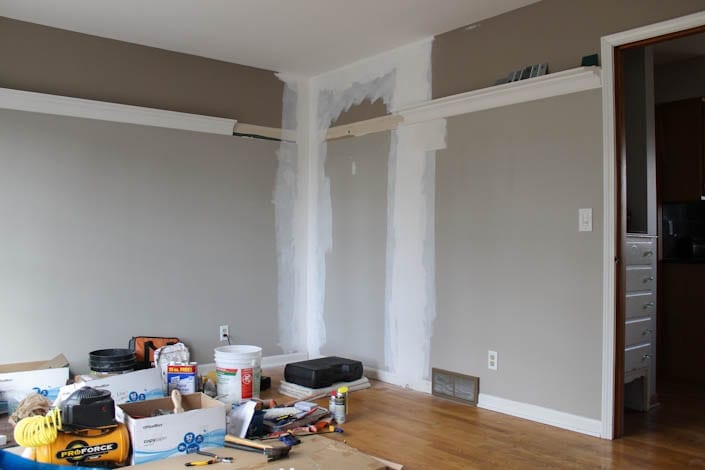
and this is what happened on the other side of that wall, in the former formal dining room:
The Flooring and Walls (the pretty part):
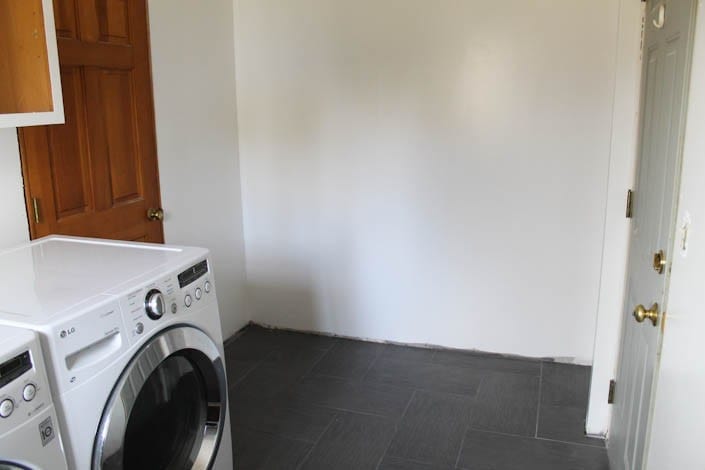
The floors weren't a deal breaker but definitely showing wear. We ripped them out and replaced with this 12 x 24 porcelain tile from Home Depot and laid them in a herringbone pattern. I'm so happy with how they turned out!
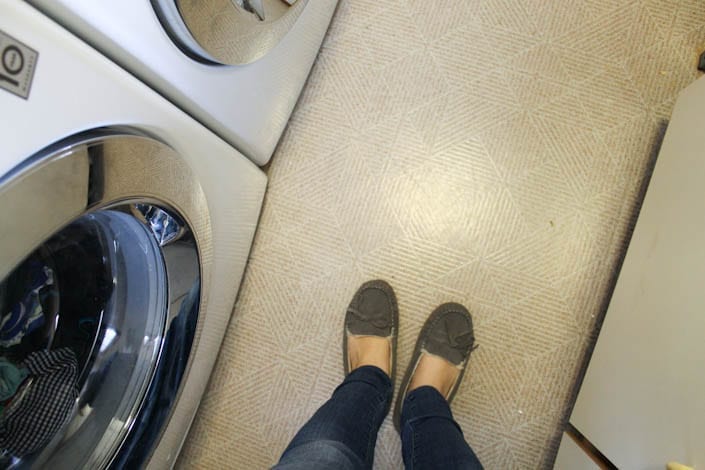
As you can see, the floors are a bit dusty from renovation and need to be mopped. But hey, this is probably close to a good representation of what it'll look like with kids. 🙂
 To keep things simple, we painted the walls, trim, and cabinets all the same color, Behr's "Polar Bear" in semi-gloss.
To paint the trim and cabinets, we did our regular method of lightly sanding, coat with Zinsser Cover Stain, then a few coats of the paint (sanding any drips or imperfections in between coats).
You may think I'm nuts for going white in a laundry room/mudroom for a family of six. My reasoning is that it's a small room that is going to see a lot of messes. Laundry, coats, shoes, dirt, crap on the countertop... they all will add color and clutter to the room. Maybe it looks sterile to some, but that's what I wanted: the illusion of a clean room. We used a semi-gloss that will hopefully help and be easily wiped down. And if it gets too messy and I can't handle it? Well, then we'll just repaint. 🙂
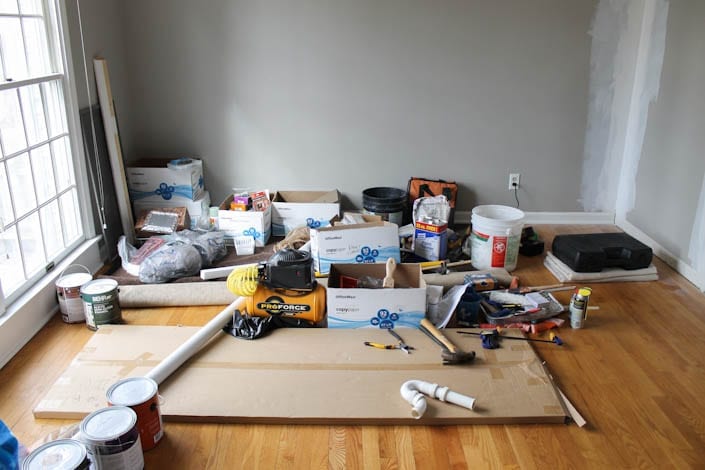
And finally, a bit of real life.
I always see comments on Instagram or Facebook or wherever saying "ahh, jealous!!!" I know nothing is meant by the word jealous, but I always laugh because it is said whenever we went through a lot of crap to get to that point.
Our dining room has looked like this for the last month. Jealous now? 😉
I'm so thankful that we even have a laundry room. I'm happy we're taking steps to make it better. I am proud of the fact that we can put hard work into something and get such a great result. And I'll gladly have a room filled with stuff if it means time saved from having to go up and down the stairs. When it gets cleaned up, I'll appreciate the room a little bit more. At least that's how it's happened in the past.
I am so itching to do something fun with this room. But for now, I'm telling my brain to keep my ideas on a pin board and focus on the laundry room project at hand. And close the blinds the second it gets dark so that the neighbors don't think we're nuts. 😉
Kate Branham
What you did with the laundry room was amazing! You were able to create so much usable space just by moving a counter and sink! I have a small laundry room as well and have wondered how I could create more room in it. You have given me some great ideas!! Now time to hit the drawing board!
Cindy
Awesome renovation! Our laundry room is my least favorite room in the house. I don't ever want to go in there but I must to get the laundry done. I'm hoping for inspiration now that we will be painting the basement next and the laundry room is down there. And...I see mom cave possibilities for the room you took the nook out of. Or a really lovely dining room.
Cindy
Btw-could you reface the cabinet doors with white beadboard?
G.M.L
That new flooring looks great! It looks like you guys did a great job on everything!
Micah P
Great work. I love the tiles in the laundry room. The workmanship is great. I can tell a lot of the details were not skipped in the work. Beautiful pics.
Lauren B
I feel ya! We're in a slow remodel here at our house as well. I'm antsy to jump into every project, but I'm trying to breathe deep and go bit by bit. The white looks great - I understand the desire to have a clean looking room to do your cleaning in! Have you checked out buying new cabinet doors? There are tons of places online that make them and some of the rates are really reasonable. We are looking into doing the same thing for our oversized bathroom vanity. It'll be $100 for 4 new shaker style, paint-grade doors. We tackle lots of DIY around here, but I don't think cabinet making is my true calling. 🙂 Good luck - it looks great! (especially love that flooring!)
Katherines Corner
Wow, your hard work shows. I look forward to the big reveal. You have the skills and the vision and I have the patience to wait for your nest update. I invite you to share at my Thursday Favorite Things blog hop . Hugs! P.S. Congratulations on being one of the top DIY blogs to follow in 2015
The lovely one
Your laundry room is looking great! It's going to be awesome when it's all done!
Nancy Speich
Rustoleum makes a countertop paint that you could try on the laminate doors (not the expensive countertop refinisher, but a regular paint), or you could see if local DIY center sells a premade cabinet door that would work. I'd look into the 35mm euro hinges for mounting as they are easily mounted, adjusted and don't show.
Miranda Irby
I am so impressed that you guys can do this! I'm way to scared to make any major changes to my house!!
Andrea
That room sure would make a good homeschool room! 😉